Showing posts with label Tutorials. Show all posts


How To Use CCleaner To Speed Up Computer and Free Disk Space


Learn how to use ccleaner to improve PC Speed. Free Up C drive space with CCleaner. This tutorial will teach you how to use ccleaner to speed up PC.

How to use ccleaner

Low Space Error on C Drive – Background

As most of us install Operating System in Our C Drive. With time to time Files get piled up and eventually C drive gets Full. When we install new software and application. Each software files occupy files in C drive program files. This put us in a serious situation. Because we start getting notification error “Low Disk Space” on C drive.

If we don’t add space then unfortunately we cannot install new softwares in C Drive 🙁 . Ultimately we have to reinstall the operating C Drive and re partition C Drive with More space and start over. This problem of Low C Drive Space was a trigger that there should be a easy to use Tool which can cleanup C Drive Space and solve this problem.

What is CCLeaner and How it Works?

Keeping in view the above problem PiriForm launched the famous software called CCleaner. As the name of this tool suggests it Cleans C Drive. CCleaner deletes temporary files from C Drive far more better than Windows Built in Drive Cleaner option. Not only general temporary files but it also clean up application temp file. Browsers history, cache, cookie and other a lot of stuff. Finally CCleaner Free up huge disk space on your C Drive. Today I’ll teach you how to use ccleaner to achieve optimum results.

Running CCleaner for the first time may free GBs of Space. Don’t believe it? Well i didn’t believe it as well until I started using CCleaner. This software speed up your computer like a super computer.  Improve PC Performance with CCleaner. Athough CCleaner is very simple and easy to use. Yet there is huge community of people who don’t know how to use CCleaner. Therefore I though it would be best if I write detail post on CCleaner Use.

Type of Files Which CCleaner Deletes

To free up disk space from your computer, CCleaner deletes following file types:-

  • Temporary Internet Files
  • History
  • Cookies
  • Recently Typed URLs
  • Index .dat Files
  • Last Download Action
  • Auto complete Form History
  • Saved Passwords
  • Recent Document
  • Run command History
  • Thumbnail Cache
  • Taskbar Jump List
  • Empties Recycle Bin
  • Clipboard
  • Memory Dump
  • ChkDsk File Fragments
  • DNS Cache
  • Font Cache
  • Old Prefetch Data
  • Menu Order Cache
  • All Software Temporary Files

Note that you have option to check/uncheck each file type. So if you don’t want saved passwords to be cleaned up. Uncheck them.

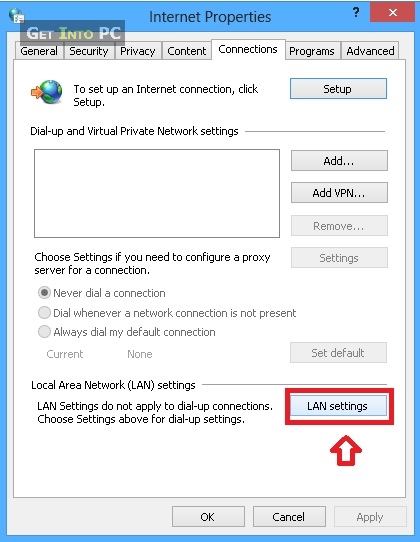
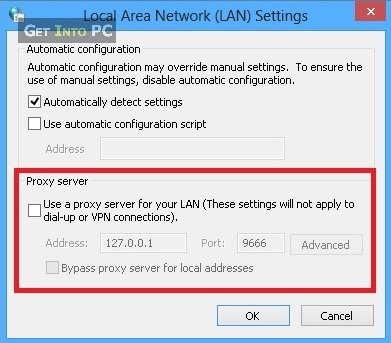
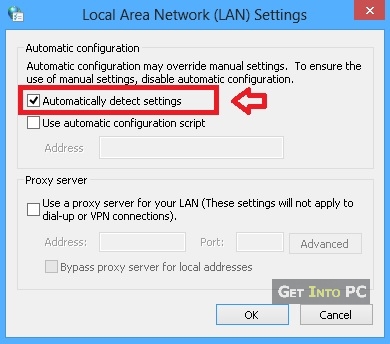
How To Use CCleaner – Simple Steps

Below is step by step tutorial on how to use CCleaner. For your ease I have splitted the tutorial in two parts. In first half you’ll see method to Free up space on C Drive. Whereas in second half you’ll learn to fix registry issues using CCleaner.

First of all you need to download CCleaner if you don’t already have. Click on below option for ccleaner free download for windows and Mac.

CCleaner Download


You can also Learn How to Make your Windows Startup Faster.

Use CCleaner To Free Up Disk Space

Step 1 – Open CCleaner

Double click the CCleaner to launch application.

step 1 Open CCleaner

Step 2 – Select Cleaning Options

From the left check boxes, Select the options which should be used while freeing up space. Choose each option wisely. If you don’t want password to be removed. Then don’t check the password options. Similarly if you like autocomplete form option. Then uncheck them.

NOTE: If you want that CCleaner  quickly free up Space. Then Make sure You have unchecked “Wipe Free Space”

step 2 Select Options and analyze


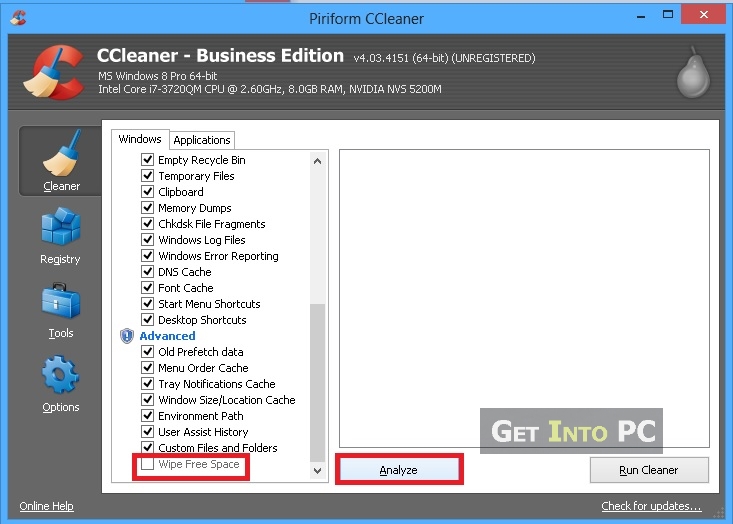
Step 3 – Click CCleaner Analyze Button

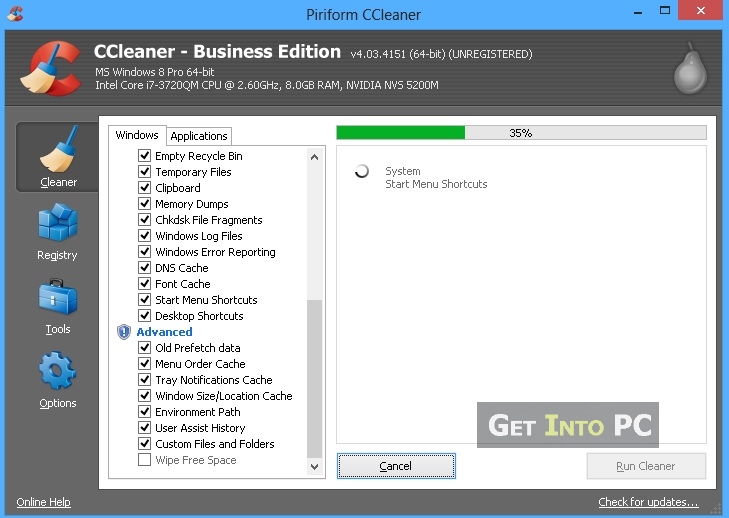
Once you have opened Analyze button, CCleaner will start analyzing the files. You’ll see below screenshot.

step 3 CCleaner Will Analyse

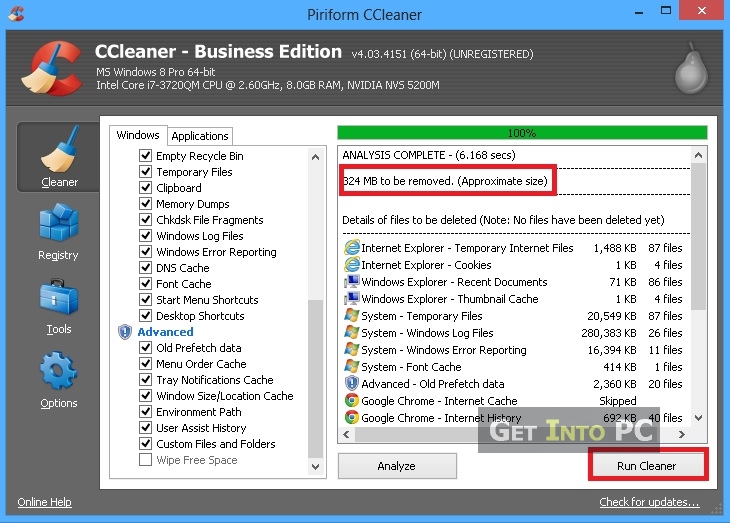
Step 4 – Click “Run CCleaner” Button

Once analysis is complete. You’ll see how much space CCleaner can free up from C drive. Then hit the bottom right button to start Cleaning files.

step 4 Run CCleaner

Step 4 – Space is Free From C Drive

Once running will be complete. You’ll notice that huge amount of space is free on C Drive now.

step 5 Free up C Disk Space completed

Use CCleaner To Fix Registry Issues

The second important part in how to use ccleaner is to fix windows registry. Follow below simple method for Registry optimization.

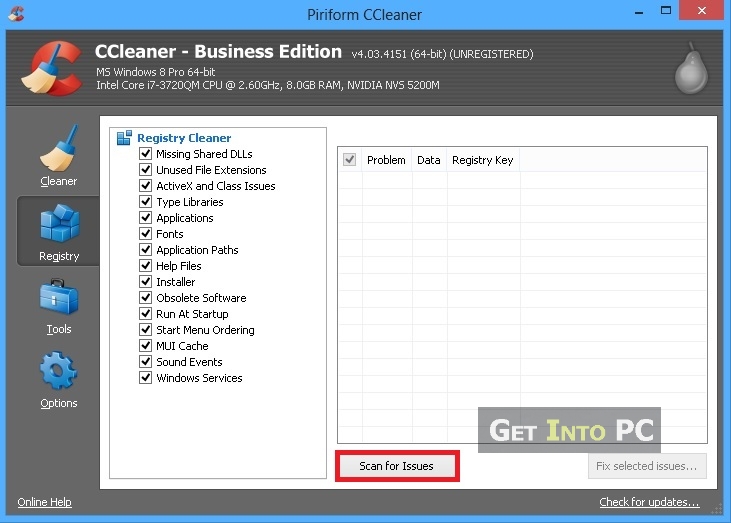
Step 1 – Open Registry Cleaner

From the left option you can click Registry icon. Then hit button “Scan For issues”.

step 1 Registry cleaner

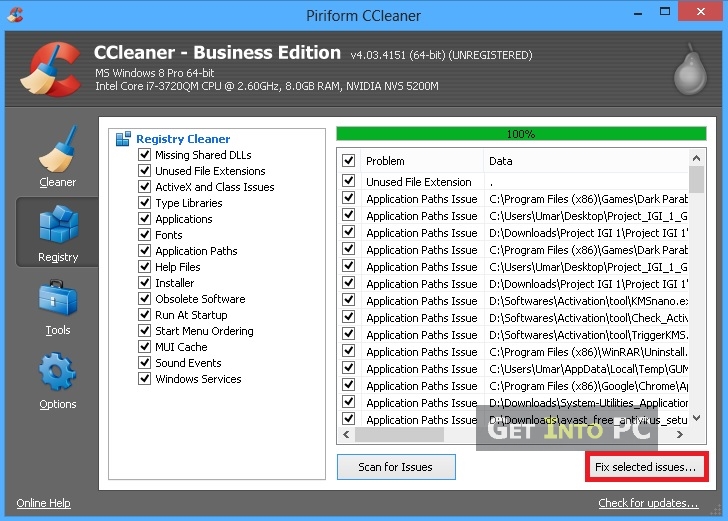
Step 2 – Click “Fix Selected Issues”

Once analysis is complete. You can click button to start Fixing registry issues.

step 2 fix registry issues

Step 3 – Backup Registry Settings

You’ll be prompted to backup registry settings before fixing registry problems. Click Yes and browse for location where you want to save Registry settings backup.

step 3 backup registry changes

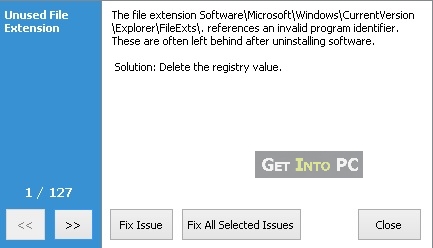
Step 4 – Fix Registry Issues

Then you’ll see option to either fix each issue one by one or to fix all registry errors at once. Click Fix All Button.

step 4 fix all selected issues


So you are done. All Windows registry issues are solved now. So you have successfully used CCleaner to optimize PC Speed. You’ll feel a difference and that’s because PC speed is up. You computer performance will be improved. Now you can install more softwares in C drive. 🙂

How To Use CCleaner on Mac To Free Up Space?

If you have Mac OS then the only difference is that you need to install CCleaner DMG file for Mac. The process of cleaning space is same as per above screenshots.

Just open CClenaer on Mac. Then Check options for clearing up Disk Space. Then Run CCleaner On Mac Operating System.

Let us know if we missed anything or how can we improve this tutorial for using CCleaner.

If you want to clear more see the detailed guide to clear space in Full C Drive.

How To Change Proxy On Chrome – Easy Steps
How To Change Proxy On Chrome with easy steps. Change proxy settings in Google Chrome with simple method. Edit Proxy Settings in Chrome Browser.

how to change proxy on Chrome

Changing Proxy Settings in Chrome Browser

Well there may be scenarios when you need to edit proxy settings in browser. For example most of cases are when you have to unblock websites in school or offices. You can get ad free proxy. This tutorial will teach to implement secure proxy. Today many websites are blocked in different countries by ISP. The best case is YouTube is blocked in Pakistan for last 1 year now.  Don’t worry you can still unblock YouTube in Pakistan with speed. Now when you follow such steps these may involve changing proxy in Chrome web browser.

The reason I am writing this tutorial is that no everyone is a techy guy. Every one may not know how to change proxy on chrome. That’s why I came up with short and simple tutorial in which I provided step by step screenshots to teach you how to change proxy settings in google chrome. You may wonder why I am writing this tutorial only for Google chrome. The answer is simple. Google Chrome is fastest growing Browser.

Learn How To Change Proxy On Chrome

Below are simple steps. Just follow these and you can edit proxy settings in Google.

Step # 1:  Open Google Chrome Browser

The first step is to open Chrome browser. Double click on desktop chrome icon. Step is also shown on screenshot.

step 1 change proxy on chrome


Step # 2  Click on Settings Option

Second step is to Click on “Settings” option in Google Chrome as per below screenshot.

step 2 change proxy on chrome

You’ll see below settings pane in Google Chrome. On Top Right you’ll see a input box. Locate “Search Settings” input box.

google chrome settings

Step # 3  Choose Option “Change Proxy Settings”

From the keyboard type “proxy” in search box. Then a button will appear in bottom saying “Change Proxy Settings”. Click on this button.


step 3 how to change proxy on chrome

Step # 4  Click LAN Settings Button on Internet Properties

Internet Properties option box will appear. Click on LAN Settings option.

step 4 change network lan settings

Step # 5  Local Area Network (LAN) Settings

A dialog box will open. This is called LAN settings option. You’ll see proxy server settings here in red highlighted area in snapshot.

step 5 change proxy server settings in lan options


Step # 6  Edit IP and Port in Proxy Server

You can add or edit IP address and Port in highlighted areas as below screenshot. You can get new proxy addresses from here. This is online proxy checker and web proxy service. Uncheck the “Automatically Detect Settings” option.

step 6 change proxy settings edit IP and port

Click OK to Apply the settings and then again Press OK to close Internet Properties options. You can test if Changed Proxy Worked Open Google Chrome and open websites. If proxy change in Google chrome is successful Websites will be opened but your IP will be changed.

How To Revert Back to Direct Internet (No Proxy)

Now if you want to revert changes. I mean if you want to surf without any proxy. Then follow the above same procedure. Below is the screenshot for your ease.

how to remove proxy from Google chrome

  1. Clear the IP and Port Number.
  2. Uncheck the Option “Use a proxy server for your LAN”.
  3. Only Check “Automatically Detection Setting” option.
  4. Press OK and Save Settings.
How to Speed YouTube Buffering on Slow Internet

People prefer YouTube over other video networks, Because this is biggest video community. Learn how you can speed YouTube buffering on slow internet.

Some people really feel issue with YouTube buffering speed on poor networks. I’ll share some tips and tricks to improve buffering speed of YouTube  The most important factor on which YouTube buffer speed depends is your internet connection. However for people which have slow internet they can also speed youtube buffering. Below are the methods which will help you to boost video buffering.

how to speed youtube buffering on slow internet

First of all for countries where youtube is blocked e.g You can unblock Youtube in Pakistan in Full Speed. Once YouTube is unblocked You can download Youtube videos with IDM using Proxy.

Tips To Speed YouTube Buffering

Trick 1: Increase Your Internet Speed

I already shared some tips to boost internet speed. Follow that recommendation as first step. You can boost internet connection speed by 20% with that. Once done that you’re internet speed will be increased and you’ll feel a difference. This will surely impact YouTube buffering speed.

increase internet speed


Trick 2: YouTube Feathers Project

Join the new YouTube project names as YouTube Feathers. This is in beta release. Click this link and then click on “Join YouTube Feathers Beta”. You’ll see increased buffering speed.

speed youtube buffering


Note that in YouTube feathers there are few limitations.

  • You don’t see comments in YouTube Feathers.
  • No Like or Dislike Video Option
  • Related Videos count will be limited to 5.

I think these limitations are not a problem for users who want to increase YouTube video buffering speed.

Trick 3: Use Video Accelerator Software

You can also try third party video accelerator application. This will also play a role to improve video buffering speed of YouTube  You can download SpeedBit Video accelerator here.

download button


Trick 4: Change Quality of YouTube Video

On low bandwidth you can change quality of video to a low resolution. This will speedup YouTube buffering. The method to change quality is in below screenshot. I recommend setting this to to 240p if you are facing severe buffering issues.

speed youtube buffering

Please note that these are only tips to increase YouTube buffering speed. However the ultimate method is to upgrade your internet connection bandwidth.

How To Fix Fingerprint Reader on HP ProBook

Easy steps on How To Fix Fingerprint Reader on HP ProBook. Easily Fix Fingerprint Scanner on HP ProBook Laptop Series and Setup Biometric password.

Fix Fingerprint Reader on HP probook

It took me long to find correct way to setup fingerprint reader in HP probook series laptop. Initially when I purchased laptop the installed OS had already setup every thing. But soon after re installing new Windows, I was unable to Fix Fingerprint scanner on HP laptop. I searched on HP forums to setup biometric in probook but none of the post help me.

Finally I found a way to fix fingerprint reader and setup fingerprint password in HP Probook laptop. I though I should share it with all those guyz who are facing problem with fingerprint scanner in HP probook series.

Learn To Fix Fingerprint Reader on HP ProBook

This is complete step by Step tutorial to setup biometrix fingerprint reader on HP Probook series laptop.

Step 1: Download Microsoft .NET Framework 4.5

To setup fingerprint biometric reader on HP Probook series, first of all you have to download latest .NET Framwork 4.5. I have provided direct download link for .NET 4.5 This is official Microsoft link for standalone installer of .NET 4.5

download button

After download you have to install .NET Framework 4.5 setup file named (dotnetfx45_full_x86_x64.exe). Without installation of .NET framework 4.5 the below HP applications cannot be installed.

Fix Fingerprint Reader on HP step 1 .net install

Step 2: Download HP ProtectTools Security Manager

Now the second important step to fix HP fingerprint scanner is to download HP Protecttools security manager. This is needed to setup HP biometric fingerprint reader in Probook series laptop. The download link is from official HP website.


Once security manager is downloaded, install its setup file and wait until the installation is complete.

Fix Fingerprint scanner on probook step 2

Once installation is complete, restart your laptop.

Step 3: Configuration of ProtectTools Security Manager

After PC is restarted you’ll see below screen to start Configuration of ProtectTools Security manager. You have to configure it.

Fix HP Fingerprint Reader on Probook step 3

Security manager will require Windows Password. You can give recovery question answers as well. Once its configuration is complete. Then go to step 4.

Fix biometric Reader on HP step 4


Step 4: Download Device Access Manager for ProtectTools

Third step is to install HP Device Access Manager application. This is also necessary tool which should be installed before fixing HP fingerprint biometric scanner on probook series. Click on below button to download Device Access Manager from official HP Link.


After downloading, install HP Device Access Manager as per below screenshot.

Fix HP biometric Fingerprint Reader on probook step 5


Step 5: Download HP Biometric Device Driver

The last tool to install is the biometric device driver. This can be downloaded from official HP driver site. First select your laptop model and then download this biometric sensor driver. I have provided the link for HP Probook 4540s Biometric driver. If you have different HP Probook model you can download its biometric driver from here.


Install Biometric Device Driver as per below screenshot.

setup Fingerprint password on hp probook step 6


After this you’ll prompted for another validity biometric driver. Install it as per below snapshot.

Fixing Fingerprint sensor on probook laptop step 7

Step 6: Final Configuration to Setup Fingerprint Sensor

Now when all of the above are downloaded and installed in order. Just swipe your finger on laptop’s biometric sensor. The below screen would appear.

Fix Finger Reader on HP laptop step 8

Click on Manage Link and below screen will appear.

 Fix biometric sensor on HP 4540s

Expand Credentials Manager and click on FingerPrints as per below screen.

setp fingerprint password on hp probook laptop

Click on any finger and swipe finger as per on screen instructions. You have to set al-least 2 fingers for fingerprint password.

Now logoff and on windows logon screen only swipe your finger. All done.

Now I hope you have successfully implemented HP Biometric fingerprint reader fix. This will help you to setup fingerprint password for HP Probook series. Let us know if you faced any issue while fixing fingerprint scanner in HP Probook.

Password 123